A sourdough starter is not hard to make. But the more you understand the processes going on when making a starter, the easier it will be to make the perfect starter for you. With these five tips on making a sourdough starter, you’re off to a good start.
These 5 tips will help you get started. Let’s dive in.

As with most things, a good basis determines much of the outcome. Baking with sourdough is no different. If you have a good and mature sourdough starter, it’s very like you’ll get a good loaf of bread. On the other hand, if your sourdough starter is weak, it will have a hard time giving your loaf a tasty and good texture.
Life long skills
Learning something new usually comes with learning facts as well. The same goes for baking with sourdough. You’ll have a recipe and you’ll need to weigh the precise amount of water, flour, starter and salt. But learning to bake with sourdough also comes with many intangable skills. Skills that you can’t weigh or measure. The more you bake and try, the more you will learn. You will develop a “feeling” for when the dough is right and experience, which will definitely come with trail and error, will teach you when a starter is strong enough and ready to be used.
With these tips I also want to take you along some of those skills that you can’t learn by just doing, you have to experience then. That will ultimitely give you so much joy. Because you will gain many new skills that nobody can take away for you, but you can only develop them further. And, maybe even more beautiful, you can pass them on to someone else.
This post may contain affiliate links, which means I make a small commission at no extra cost to you. See my full disclosure here.
- How do I become great at baking with sourdough?
Baking with sourdough is a skill that’s ideally passed on to future generations if you ask me. It’s to be learned hands-on. Literaly, with your hands in the dough. Streching, kneading, feeling shaping, smelling.
Because sourdough is much more prone to changes in humidity and temperature, the only way to yield consistent results is by trying and experience. You’ve got to be brave. If you’re willing to give it your best effort, even then, you’ll fail (or feel like it), get up again, try again, gain more experience and develop a nose for great sourdough goods. And before you know it you’re the one passing on those precious sourdough skills!
- How do I make a good sourdough starter?
First of, follow the recipe for making a starter precisely. With every sourdough starter you start from scratch, it’s better to weigh the ingredients rather than using cups.
You can find a recipe in my free e-book “Starting Sourdough”. Later, when you’ll actually make bread dough and you gain more and more experience, you could return to cups again if that’s what you prefer. But with a starter you want to make sure you have the ratios as exact as possible.

1. Use a clean jar when you start
While this may seem like an obvious choice. You must make sure the jar you start with is actually very clean. Preferably, boil in hot water or sanitize the jar in the oven. Let dry on a clean towel. A clean jar ensures that there are no (or at least less) “bad” bacteria in the jar that could interfere with the “good” bacteria we’re trying to grow here.
2. Don’t use a clean jar after day 1
You may think: “Huh?!, first I’m supposed to use a very clean jar and then I shouldn’t?”. Bear with me… Here is what I experienced. Once I started a new starter and put the right amount of starter in a new, clean jar and fed it, oftentimes the starter would die. I guess you kind of create an environment in the jar that’s perfect for the starter. When you constantly change jars, you’ll inevetably introduce new bacteria that may give your good bacteria a hard time.

3. Feed the starter when it reached it’s peak
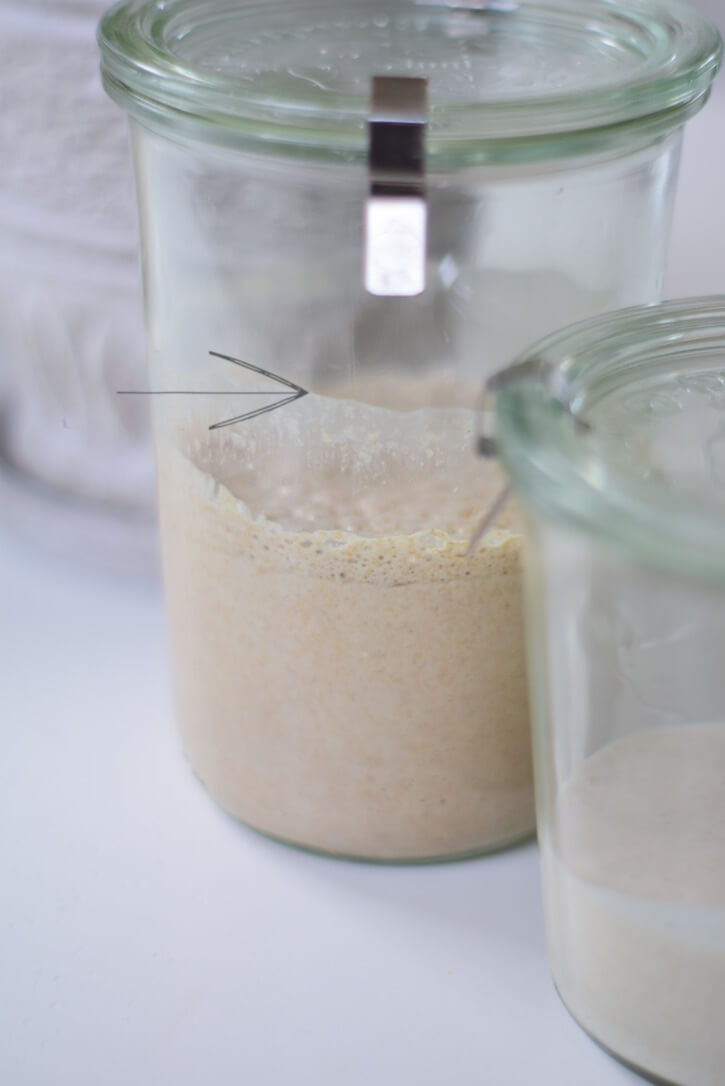
When you have a well established starter it will rise after each feed and then comes down again. That’s a good sign. It means your starter is active and using the water and flour you added to feed on. It’s important not to feed your starter before it peaks or you’ll just dillute it, resulting in a weaker starter. The image on the side shows the line where the starter peaked. It then sank down again.
4. Use your nose
Try to determine what your starter smells like, often. Very often. This will be helpful the more you will bake with sourdough. Smell your starter in the morning, smell your starter when you just fed it, when it’s ready to bake with and all the moments in between. Eventually, you’ll develop the skill to descern between a ripe and an unripe starter.

5. Stir well
Your starter will get hungry every day. So, when you measured the water and flour to feed your starter, make sure you mix them well so the starter can feed on it. I find it easiest to put my starter on a scale, jar and all, and add the water. Then stirr well untill the starter is dissolved in the water. Lastly, add the flour and mix well. Make sure to mix in any flour that’s sticking to the sides of the jar.
Lastly…
I want to encourage you to just start. Don’t wait untill you have the perfect equipment or that special type of ancient grain. Just try and experiment with what you have now. And probably, you’ll discover that you can. You too can bake with sourdough and you can be the one passing on the precious skills. When you have a an established sourdough starter be sure to check out other sourdough recipes from the Haven of Rest like this sourdough raisin bread with ancient grains. Enjoy the learning experience!

Pin for later


